Contents
- What is a Sims 4 Default Skin Replacement Mod?
- Popular Sims 4 Default Skin Replacement Mods and Creators
- How to Install Sims 4 Default Skin Replacement Mods
- Combining Default Skin Replacements with Overlays and Presets
- Why Use a Default Skin Replacement?
- Tips for Choosing the Right Default Skin Replacement
If you’re passionate about customizing your Sims and want to upgrade the game’s visual experience, the Sims 4 default skin replacement is a must-have mod that completely refreshes your Sims’ appearance by replacing the game’s original skin textures with high-quality, realistic, or stylized alternatives. This article dives deep into the world of Sims 4 default skin replacements, explaining how these mods work, where to find the best default skin replacements, and how to install them properly to enhance your Create-a-Sim (CAS) experience. Whether you prefer subtle Maxis Match style blends or more realistic, smooth skin tones, default skin replacements can dramatically improve the look of all ages and genders in your game without the need for applying skins individually.
We’ll also cover popular creators like Madmono, Luumia Sims, and Nesurii, who have crafted some of the most beloved default skin mods, plus tips on combining overlays, presets, and custom content to achieve the perfect Sim skin. If you want your Sims to stand out with flawless complexions, natural shading, and beautiful undertones, this guide to Sims 4 default skin replacement will help you get started and transform your gameplay aesthetics.
What is a Sims 4 Default Skin Replacement Mod?
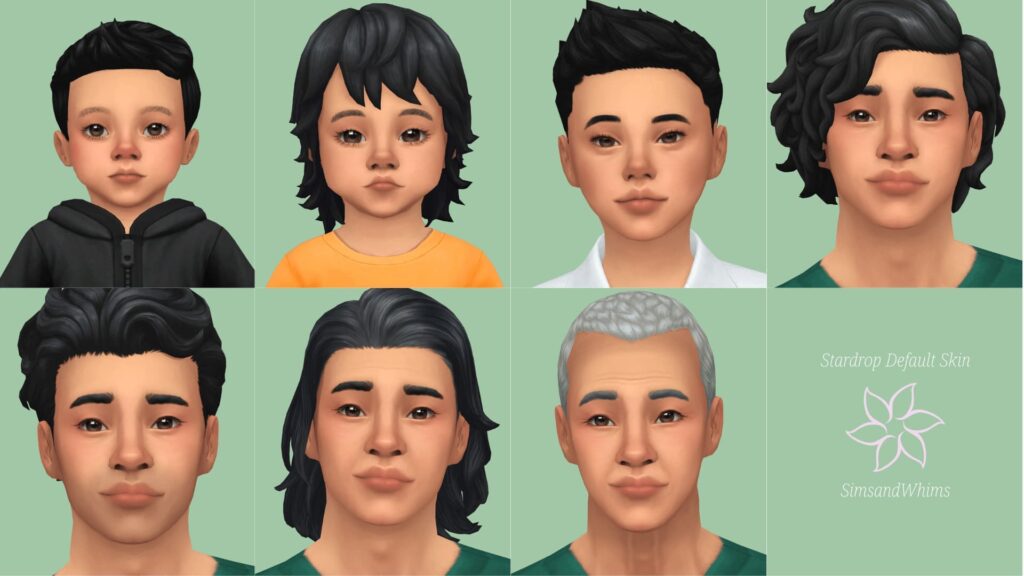
A Sims 4 default skin replacement mod swaps out the base skin textures of Sims in the game, affecting all Sims globally without needing to apply individual skins or overlays. Unlike custom content that only applies when manually selected, default skin replacements automatically update the look of every Sim you create or encounter, including NPCs, making your entire game world look more polished and consistent. These mods can range from subtle skin blends that smooth imperfections to completely new skin textures that add realistic pores, shading, and undertones.
Popular Sims 4 Default Skin Replacement Mods and Creators
Several talented modders have created default skin replacements that have become staples in the Sims 4 community:
- Madmono’s Knights Blend: A popular default skin replacement known for its smooth, natural look that enhances Sims without making them look overly realistic or cartoonish. Many players swear by this mod as a subtle, elegant upgrade to the base game skin.
- Luumia Sims’ Vanilla Skin: This mod offers a Maxis Match-friendly skin replacement that balances realism and the game’s original art style, making it perfect for players who want a fresh but familiar look. You can find Luumia’s skins and other custom content on Luumia Sims’ website.
- Nesurii’s Default Skins: Known for creating beautiful default skins like AEONIUM, AGAVE, THUJA, and PYRUS, Nesurii’s mods add subtle details such as fuller lips, natural shading, and eye bags that bring Sims to life. These skins are easy to install and widely recommended for enhancing CAS visuals9. You can download these skins directly from Nesurii’s Tumblr.
- Pyxis’ Summer Skeleton V2: Another well-regarded skin mod that offers a natural and smooth skin texture, loved by many for its realistic undertones and versatility.

How to Install Sims 4 Default Skin Replacement Mods
Installing a Sims 4 default skin replacement mod is straightforward but requires enabling mods in your game settings:
- Enable Mods in Game Settings: Launch Sims 4, go to Options > Game Options > Other, and check “Enable Custom Content and Mods.” Restart the game to apply changes.
- Download Your Chosen Default Skin Replacement: Visit trusted sites like Mod The Sims, CurseForge, or creators’ official pages such as Luumia Sims or Nesurii’s Tumblr.
- Extract and Place Files: Most mods come in .package files. Extract them if zipped, then place the files into your Sims 4 Mods folder, usually located at Documents > Electronic Arts > The Sims 4 > Mods.
- Check for Compatibility: Some skin replacements work best with specific overlays or presets. Follow the creator’s instructions for best results.
- Launch the Game and Enjoy: Your Sims will now have the updated default skin textures applied automatically.
Combining Default Skin Replacements with Overlays and Presets
To further customize your Sims’ appearance, many players combine default skin replacements with overlays and facial presets:
- Skin Overlays add freckles, moles, blush, and other details that enhance realism or stylistic effects. Popular overlay creators include Poyopoyo and Heihu.
- Facial Presets adjust jawlines, noses, eyes, and lips to complement the skin textures and create unique Sim faces. Creators like Northern Siberia Winds and Twisted Cat offer excellent presets4.
- Eye and Hair Mods can also be paired with skin replacements for a fully cohesive Sim look.
Why Use a Default Skin Replacement?
- Consistency: Automatically applies to all Sims, including NPCs, for a uniform look.
- Time-Saving: No need to manually apply skins or overlays to each Sim.
- Enhanced Visuals: Upgrades the game’s default textures with more natural shading, smoothness, and detail.
- Customization: Works well with other mods and CC to create the perfect Sim aesthetic.
Tips for Choosing the Right Default Skin Replacement
- Decide if you want a Maxis Match style (cartoony but improved) or a more realistic skin.
- Check if the mod supports all ages and genders for full game coverage.
- Look for mods with regular updates and good community feedback.
- Combine skin replacements with overlays and presets for a layered, polished look.


